Tuesday, 21 June 2011

The Fleet Air Arm Museum Alternative Photos Example 1

The Fleet Air Arm Museum at RNAS Yeovilton in Somerset England is the National
Museum for the Royal Navy. The museum represents the flying arm of the Royal
Navy but also has the first Concorde. RNAS Yeovilton is home to the
Royal Navy's Lynx and Commando Helicopter Forces.                                                                                                                                                                                                         
A visit to an aircraft museum can means lots of boring pictures of aircraft sitting in
hangers. 
On the day I took my share of those pictures which get filed and eventually deleted 
but I try to take pictures that are different and haven’t been taken before by the
millions of previous visitors. 
Check out Gavin Hoey  for some more great ideas.                                                                                                                                                                                                                
I've put together 5 examples of alternative images.
All are fairly common techniques but I find that I get more pleasure looking at
pictures that make me think rather than looking at picture of just common
objects taken from common angles.                                                                                                                                                                                                                             
Here is Example 1      GET IN CLOSE  


As well as taking pictures of the whole aircraft, get in close and take pictures 
that show off colours and textures like the aircraft wing above.
There are a limited amount of aircraft but an unlimited amount of textures,
colours, components and angles. 
Don’t be afraid to change the contrast or saturation or even change the image
to black and white.
I like to digitally frame and share any photos that I have enjoyed creating.  
So go ahead, take the family snaps and the normal tourist photos
then just STOP and look for that exciting image.


This Jet engine intake fan was tucked away in a dingy recess.
By simply increasing the colour saturation  and exposure
you can now see the details on the blades as they take on this bronze colour.
                                      

Fleet Air Arm Museum Example 2

Example 2 SHOOT IN RAW 
I ALWAYS SHOOT IN RAW FORMAT as it gives me maximum flexibility to change the image at any time after the shot has been taken. RAW contains all of the information collected by the sensor but a jpeg has been compressed into a smaller file and loses a lot of this flexibility. 
This image of Concorde’s engine was taken without a flash in a very dark corner of the hanger. 
Handheld it’s even blurred. Consequently the image is dull and would normally be deleted as of no interest. However as it is shot in RAW I could do some major adjustments in Camera Raw or Lightroom without losing quality. Vibrance, Saturation, Exposure and Contrast were all changed not just by tweaking as normal but by moving the sliders allot and in some cases to the maximum giving this almost HDR effect. I have not added any colour just maxed out what was captured by the camera.    


Fleet Air Arm Museum Example 3

Example 3 PANORAMAS
Hangers and aircraft are large and difficult to capture without very wide angle lenses. This shot captures not only the aircraft but the entire hanger, by taking these 5 handheld images that overlap by about 30%. I've used PTGUI to stitch them all together but many other programs including Photoshop and GIMP can do the same. Again it’s capturing an image that the normal camera owner cannot. 
                                   

Fleet Air Arm Museum Example 4

Example 4 - 2D to 3D POP OUT OF FRAME EFFECT. This shot of a Lynx Helicopter taking off with its dramatic sky was ok considering it was shot through a window. However by spending a short time in GIMP or Photoshop it can be transformed into this almost 3D image which makes the aircraft look as if it’s flying out of the photo.  

ORIGINAL IMAGE


Fleet Air Arm Museum Example 5

Example 5MAKE IT COME TO LIFE. By selecting only the propeller, engine and part of one wing I can put the fighter back in the sky where it belongs. I've used the pen tool in Photoshop to extract the parts I need. The Blades have been duplicated, blurred and rotated to indicate they are spinning. I've duplicated the right wing then flipped it to create the left wing. Saved as a PSD (Photoshop Document) the layers remain separated so it’s easy to go back and change the background. When I took this shot I did not have the final image planned but I always get home and carefully look at each image many times before trying to create something different. It doesn’t always work but when it does I get a real buzz.         
ORIGINAL SHOT

BLUE SKY APPROACH

SWIRLING BACKGROUND

Thursday, 9 June 2011

My Local Park in HDR

HDR (High Dynamic Range) Image

Original Image


The original image looks pretty flat and dull.
I took the photo in RAW format I was able to produce 5 separate images with exposure values of -2, -1, 0, +1, +2. These images were combined to increase the dynamic range.
In other words the image now includes the detail in the dark as well as the light areas.

Sunday, 19 December 2010

Exposure compensation. How to get the snow white!!!

When you take pictures in the snow, your camera meter is fooled by all of the white in the picture and under exposes the images by about 1.5 stops.
I thought I would test this theory and took the three images above.
you can see the image on the left is too dark and the Histogram is to the left. In the centre image I have adjusted the camera by +2 stops of compensation and the graph is just creeping off the right hand side of the Histogram, overexposing some of the sky. Adding 1.5 stops to the centre image would have been about right.
The right hand image shows the correct exposure with the sky, snow and car all correctly exposed. Notice the graph has not reached the right hand side of the Histogram. For this shot I used a handheld ambient light meter to get the exact reading which was +1.5 stops. Oh just one more thing! The blacks are on the left of the graph and whites are on the right.
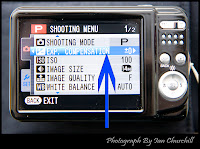
NOTE! Even if you own a compact point and shoot camera, you can adjust the exposure compensation using the (P) program Mode as shown on the photo of the screen on my Fuji.

Wednesday, 15 December 2010

Home Made Christmas Card from the Churchill's

I wanted to make a Christmas card that I could send to my friends on Facebook so with the help of Gavin Hoeys tutorial I produced this video from 9 images taken from a Photoshop PSD file. The images were then imported into Windows Movie Maker so that I could make the card twinkle. Some of the9  images were used quite a few times to make the lights flash on and off. I know its not professional quality but I have learnt a new trick which I can explore and refine.

Saturday, 11 December 2010

Robin on Footbridge


Robin on Footbridge, originally uploaded by Ian_Churchill2010.
Here is another image of a different Robin taken on the same day as the last post. The image was taken in a quiet gloomy area at the same country park. I think this image shows a different mood than the last one. Again I have positioned the bird in the frame according to the rule of thirds ie. the Robins eye is a third of the way in from the top and side of the image. Its much better than putting things in the middle as it guides your eye through the image. Thats COMPOSITION!

Friday, 10 December 2010

A Friendly Robin. A welcome splash of Colour on a dull December day .

I took a trip to my local country park on a cold and grey December afternoon, hoping to capture some wildlife shots. Birds keep people at a safe distance so walking around with a camera just scares them away. I decided to sit quietly for a while and wait. Within a few minutes this Robin and a Nuthatch perched about 4 feet away just looking at me. I carefully lifted my camera and the Nuthatch flew away, leaving this friendly robin. Maybe next time I'll take some wild bird food with me to attract the birds in close.