Monday, 4 February 2013

My DIY Dew Heaters for just a few £'s

I thought I would share my Dew Heater design as it was so easy and cheap to make.
Without the battery these heaters cost me less than £10.

Dew heaters can be expensive and often need expensive controllers to adjust the temperature output of each heater. The idea is to heat the corrector plate end of the telescope just enough to replace the heat lost to space thus stopping dew from forming on the lens. Much like the dew on your car windscreen collects overnight.

My aim was to design a simple and cheap 12 volt system without the fancy heat controllers.This would save me using a 240 volt hair dryer with is obvious dangers outside in the damp night conditions.

I worked out from research on the net that I needed somewhere between 0.5 watts and 1.5 watts of heat on my finder scope and between 1 watt and 2.75 watts on my 105mm dia Meade etx.

If you look at the diagram this can be achieved by wiring both dew heaters together across a 12 volt battery (mines an old car battery). To adjust the heat output I simply use a direct connection across the battery for maximum heat or add either one or two 10 ohm resistors in line next to the battery as shown in the diagram below. SIMPLE.


The wiring is looped back around the heater band so that it can be easily attached.
The parts list shows roughly what I needed.

The resistors are really cheap. They come in bags of 20 and you only need 11 x 4.7 ohm resistors
and 13 x 10 ohm resistors for the whole job.
Just solder the resistors together exactly like the diagram and stick them on the inside of the foam using duck tape. Connect them to the battery car with speaker wire and watch out for any short circuits.
A cheap foam camping matt was used as the band to carry the resistors. It would make loads of bands.
I use self adhesive Velcro on each end to easily attach and detach the heater bands.

Last night I used the heaters connected to a car battery continuously for 5 hours at between +3 and -2 degrees with no dew on my lenses. I did not see any reduction in image quality due to the heat.

Please note that I am not an electrician and if you choose to copy this design you do so at your own risk .If wired incorrectly the resistors or wiring could overheat.

Sunday, 3 February 2013

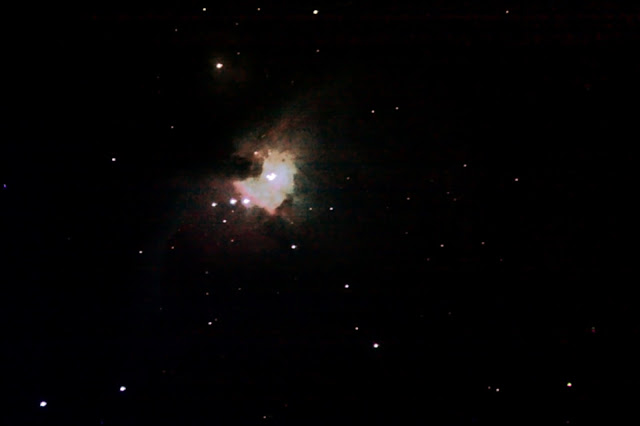
M42 Last night poor seeing?

Poor seeing in the upper atmosphere and -2 degrees made it a difficult night with the scope. I only managed 6 images worth saving and stacked them to produce this image. I spent most of the time indoors shooting tethered to the unmodified DSLR camera.
6 x 30secs subs.
3 darks
3 lights
2 bias.
Analysing the reject subs for "jerky star trails" on my etx made me strip the RA drive today. I have found the base was tight to turn and the gear train sticking.

Monday, 28 January 2013

Last Nights Full Moon

Last Nights Full Moon is often referred to as the "Full Wolf Moon" as it was in the sky when wolves could be heard calling in the snow. Some call it the Old Full Moon.
For me the full moon always looks stunning as it hangs majestically in the sky. However its the worst time to image it. Flat and disappointing when the images are downloaded. It lacks detail because the sunlight is not casting any shadows. I've tried HDR but it looks unreal so processing this image is quite simple. Mainly contrast improvements using curves with an additional layer, its blending mode set to soft light and 20% opacity. It seem to be the best I can do without a lunar filter.

Tuesday, 15 January 2013

Today's Sun Spots.

A rare sight in southern England. 
THE SUN
 
I took this image of the Sun with my little 70mm skywatcher refractor which has a focal length of 500m mm. The camera was a Canon 400d shooting through the scope like a long telephoto lens.
Its nice an quick to set up using just a simple tripod. The filter was diy using Baader AstroSolar safety film.
PLEASE, PLEASE DON'T LOOK AT OR POINT ANY CAMERA AT THE SUN WITHOUT USING  PROPER SOLAR FILTERS OR YOU WILL SEVERELY DAMAGE YOUR EYES IN AN INSTANT.

Monday, 7 January 2013

Over saturated Moon


This picture was taken with a Canon 40D through my Etx 105 at prime focus .
Normally a colour image of the moon is grey with some slightly blueish areas. During post processing I often change elements like contrast  to bring out the shadows but I recently learnt from Filipe Alves that by increasing the saturation of the colours in the image, details about the Moons geology composition can be revealed.
I have not added any colours to this image, merely magnified the colours in the image.
It is often called a false colour image as this is not how its seen with the naked eye.
In 1992 NASA's spacecraft Galileo produced an image using filters that is remarkably similar. The blue colour shows titanium rich areas whilst the orange areas are lower in titanium. The Sea of Tranquillity where Neil Armstrong and Buzz Aldrin landed in Apollo 11 in 1969 is to the right of centre and shows up really blue so its high in titanium.
Anyway all that aside, I think its good to see the moon is not just grey but a marvolous mix of colour.

Tuesday, 11 December 2012

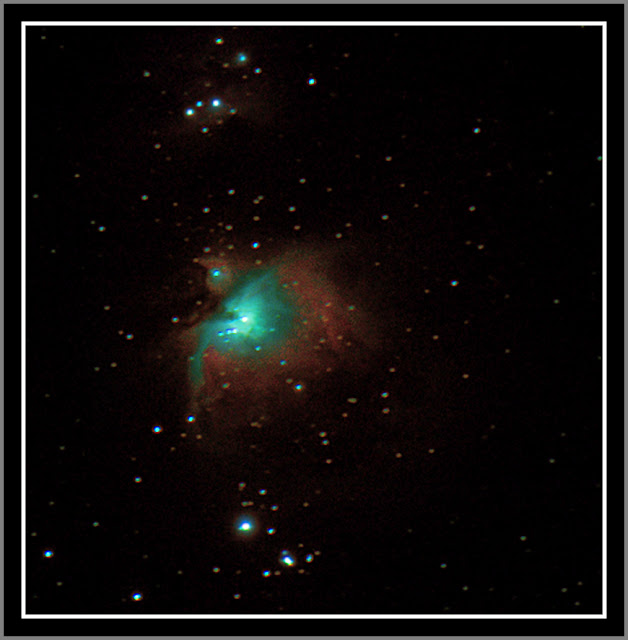
M42 Orion Nebula

About 1,344 Light Years away, this beautiful Nebula can bee seen with the naked eye as a fuzzy blob.

Situated just below Orion's belt, it forms the central part of what is often known as the sword of Orion and its the closest massive place where stars are being born.
Its still a long long way away though as a light travels at 186,000 miles ever second so just multiply
by 31,557,600 seconds in a year by 1,344 years.
I'm pleased with this image as it was unguided and I could sit in my house (in the warm) and watch the images on my laptop coming from the camera outside in the freezing cold. I just popped out and moved the tripod every 20 shots.

Technical details are;
Canon 40D unmodified with 200mm lens @F/4 controlled by APT on a Manfrotto tripod .
The Raw images were stacked using 197 Lights, 30 Darks shot at 2 sec @1600iso and 20 bias @1/8000 sec. Mirror lockup and 5sec delay and 15 seconds between frames to allow the sensor to cool down.
Stacked in DSS and adjusted in PS.
I know these astro images are light years from the quality of most astro photographers but for me I learn so much more about astronomy by taking them.
So often I just looked through my telescope in awe but didn't really understand what I was looking at. Now I enjoy checking out what I have captured during those long cloudy nights.

Sunday, 9 December 2012

Jupiters Great Red Spot

Finally I managed A reasonable image of Jupiter's Great Red Spot.
1200 images were stacked to reveal this giant storm which has been raging for at least 400 years. Two Earth's could fit inside the red spot, but with 270 mph winds its a violent place to be. A day on Jupiter lasts only 9 hours and 55 minutes so to get a picture of the spot I had to plan the time using the web. I live in a large town so light pollution can a problem until the early hours when the sky is darker.


Sunday, 2 December 2012

M31 Andromeda and M110 untracked

This image was taken not with my telescope but with a Digital slr and a 200mm lens mounted on a tripod.
 Its made up of 347 light frames, 31 dark frames and 23 Bias frames.
Without going into too much detail, the dark and bias frames are taken with the camera lens cap on and are used to eliminate camera sensor noise and hot pixels.
With a shutter speed of 3.2 seconds @F4 it took some time as I used a remote release cable. Next time I will control the camera from inside the house with the hear on.
I processed the frames using Deep Sky Stacker( another free program) which took about 6 hours before adjusting noise and levels.
 
I was really pleased to see M110 (Andromeda's dwarf spheroidal satellite galaxy) for the first time as I cant see it with my eye through the telescope. You can see M110 below and to the right of Andromeda.
Checking the image against Stellarium I noticed M32 (a Dwarf Elliptical galaxy containing a supermassive black hole with a mass as big as 5 million Suns) another of Anromeda's satalite galaxies.
The image also shows the dust lanes which look like gaps in Andromeda's spiral arms.

Monday, 19 November 2012

Jupiter

My second attempt at capturing Jupiter ( the gas giant) with a webcam. This time I used a free software program called Castrator which does a great job of aligning the 2000 images. The next step uses another free program called registax which stacks and enhances the image.
Astrophotography is a lot more difficult than I thought. Its very time consuming aligning the telescope and camera in the dark and cold at 2am. I'm pushing my Meade telescope to its limits and much of the equipment I have is homemade, so to produce images like this which show alot more detail than can be seen by looking through the scope makes it all well worth it.
 

Friday, 5 October 2012

Polaroid pictures

If you have photoshop, here is a neat and quick way of adding a twist to your favourite pictures.
A big thank you to Gavin Hoey for this free template which just takes a few clicks to use.
Gavin is an amazing photographer and teacher.
You can visit his website  at www.gavtrain.com